
Penpot 2.x Docker 部署, 开放互联网访问与各种踩坑经验
最近心血来潮, 决定将 penpot 部署到自己的服务器上, 这样以后就大部分时间都可以不依赖外部复杂的网络环环境, 可以更加流畅的使用 penpot.
流程总体还是参考 “官方教程”, 不过针对非本地部署 (loclahost) 教程中说的不是很明白, 且有一些坑点, 后面小节中会阐述.
本教程截止时, penpot 的版本为 2.2, 如果版本不一样请不要盲目照搬, 仅供参考.
下载模板
mkdir penpot
cd penpot
curl -o compose.yaml https://raw.githubusercontent.com/penpot/penpot/main/docker/images/compose.yaml
此时的目录结构:
.
└── penpot
    └── compose.yml
Compose 文件
上一节中的模板这也也粘贴一个. 需要注意的是, 该模板是为本地启动准备的, 如果需要对外提供服务, 则需要针对性修改.
networks:
  penpot:

volumes:
  penpot_postgres_v15:
  penpot_assets:
  # penpot_traefik:
  # penpot_minio:

services:
  ## Traefik service declaration example. Consider using it if you are going to expose
  ## penpot to the internet, or a different host than `localhost`.

  # traefik:
  #   image: traefik:v2.9
  #   networks:
  #     - penpot
  #   command:
  #     - "--api.insecure=true"
  #     - "--entryPoints.web.address=:80"
  #     - "--providers.docker=true"
  #     - "--providers.docker.exposedbydefault=false"
  #     - "--entryPoints.websecure.address=:443"
  #     - "--certificatesresolvers.letsencrypt.acme.tlschallenge=true"
  #     - "--certificatesresolvers.letsencrypt.acme.email=<EMAIL_ADDRESS>"
  #     - "--certificatesresolvers.letsencrypt.acme.storage=/traefik/acme.json"
  #   volumes:
  #     - "penpot_traefik:/traefik"
  #     - "/var/run/docker.sock:/var/run/docker.sock"
  #   ports:
  #     - "80:80"
  #     - "443:443"

  penpot-frontend:
    image: "penpotapp/frontend:latest"
    restart: always
    ports:
      - 9001:80

    volumes:
      - penpot_assets:/opt/data/assets

    depends_on:
      - penpot-backend
      - penpot-exporter

    networks:
      - penpot

    labels:
      - "traefik.enable=true"

      ## HTTP: example of labels for the case where penpot will be exposed to the
      ## internet with only HTTP (without HTTPS) using traefik.

      # - "traefik.http.routers.penpot-http.entrypoints=web"
      # - "traefik.http.routers.penpot-http.rule=Host(`<DOMAIN_NAME>`)"
      # - "traefik.http.services.penpot-http.loadbalancer.server.port=80"

      ## HTTPS: example of labels for the case where penpot will be exposed to the
      ## internet with HTTPS using traefik.

      # - "traefik.http.middlewares.http-redirect.redirectscheme.scheme=https"
      # - "traefik.http.middlewares.http-redirect.redirectscheme.permanent=true"
      # - "traefik.http.routers.penpot-http.entrypoints=web"
      # - "traefik.http.routers.penpot-http.rule=Host(`<DOMAIN_NAME>`)"
      # - "traefik.http.routers.penpot-http.middlewares=http-redirect"
      # - "traefik.http.routers.penpot-https.entrypoints=websecure"
      # - "traefik.http.routers.penpot-https.rule=Host(`<DOMAIN_NAME>`)"
      # - "traefik.http.services.penpot-https.loadbalancer.server.port=80"
      # - "traefik.http.routers.penpot-https.tls=true"
      # - "traefik.http.routers.penpot-https.tls.certresolver=letsencrypt"

    ## Configuration envronment variables for the frontend container. In this case, the
    ## container only needs the `PENPOT_FLAGS`. This environment variable is shared with
    ## other services, but not all flags are relevant to all services.

    environment:
      ## Relevant flags for frontend:
      ## - demo-users
      ## - login-with-github
      ## - login-with-gitlab
      ## - login-with-google
      ## - login-with-ldap
      ## - login-with-oidc
      ## - login-with-password
      ## - registration
      ## - webhooks
      ##
      ## You can read more about all available flags on:
      ## https://help.penpot.app/technical-guide/configuration/#advanced-configuration

      - PENPOT_FLAGS=enable-registration enable-login-with-password

  penpot-backend:
    image: "penpotapp/backend:latest"
    restart: always

    volumes:
      - penpot_assets:/opt/data/assets

    depends_on:
      - penpot-postgres
      - penpot-redis

    networks:
      - penpot

    ## Configuration envronment variables for the backend
    ## container.

    environment:
      ## Relevant flags for backend:
      ## - demo-users
      ## - email-verification
      ## - log-emails
      ## - log-invitation-tokens
      ## - login-with-github
      ## - login-with-gitlab
      ## - login-with-google
      ## - login-with-ldap
      ## - login-with-oidc
      ## - login-with-password
      ## - registration
      ## - secure-session-cookies
      ## - smtp
      ## - smtp-debug
      ## - telemetry
      ## - webhooks
      ## - prepl-server
      ##
      ## You can read more about all available flags and other
      ## environment variables for the backend here:
      ## https://help.penpot.app/technical-guide/configuration/#advanced-configuration

      - PENPOT_FLAGS=enable-registration enable-login-with-password disable-email-verification enable-smtp enable-prepl-server

      ## Penpot SECRET KEY. It serves as a master key from which other keys for subsystems
      ## (eg http sessions, or invitations) are derived.
      ##
      ## If you leave it commented, all created sessions and invitations will
      ## become invalid on container restart.
      ##
      ## If you going to uncomment this, we recommend to use a trully randomly generated
      ## 512 bits base64 encoded string here.  You can generate one with:
      ##
      ## python3 -c "import secrets; print(secrets.token_urlsafe(64))"

      # - PENPOT_SECRET_KEY=my-insecure-key

      ## The PREPL host. Mainly used for external programatic access to penpot backend
      ## (example: admin). By default it will listen on `localhost` but if you are going to use
      ## the `admin`, you will need to uncomment this and set the host to `0.0.0.0`.

      # - PENPOT_PREPL_HOST=0.0.0.0

      ## Public URI. If you are going to expose this instance to the internet and use it
      ## under a different domain than 'localhost', you will need to adjust it to the final
      ## domain.
      ##
      ## Consider using traefik and set the 'disable-secure-session-cookies' if you are
      ## not going to serve penpot under HTTPS.

      - PENPOT_PUBLIC_URI=http://localhost:9001

      ## Database connection parameters. Don't touch them unless you are using custom
      ## postgresql connection parameters.

      - PENPOT_DATABASE_URI=postgresql://penpot-postgres/penpot
      - PENPOT_DATABASE_USERNAME=penpot
      - PENPOT_DATABASE_PASSWORD=penpot

      ## Redis is used for the websockets notifications. Don't touch unless the redis
      ## container has different parameters or different name.

      - PENPOT_REDIS_URI=redis://penpot-redis/0

      ## Default configuration for assets storage: using filesystem based with all files
      ## stored in a docker volume.

      - PENPOT_ASSETS_STORAGE_BACKEND=assets-fs
      - PENPOT_STORAGE_ASSETS_FS_DIRECTORY=/opt/data/assets

      ## Also can be configured to to use a S3 compatible storage
      ## service like MiniIO. Look below for minio service setup.

      # - AWS_ACCESS_KEY_ID=<KEY_ID>
      # - AWS_SECRET_ACCESS_KEY=<ACCESS_KEY>
      # - PENPOT_ASSETS_STORAGE_BACKEND=assets-s3
      # - PENPOT_STORAGE_ASSETS_S3_ENDPOINT=http://penpot-minio:9000
      # - PENPOT_STORAGE_ASSETS_S3_BUCKET=<BUKET_NAME>

      ## Telemetry. When enabled, a periodical process will send anonymous data about this
      ## instance. Telemetry data will enable us to learn how the application is used,
      ## based on real scenarios. If you want to help us, please leave it enabled. You can
      ## audit what data we send with the code available on github.

      - PENPOT_TELEMETRY_ENABLED=true

      ## Example SMTP/Email configuration. By default, emails are sent to the mailcatch
      ## service, but for production usage it is recommended to setup a real SMTP
      ## provider. Emails are used to confirm user registrations & invitations. Look below
      ## how the mailcatch service is configured.

      - PENPOT_SMTP_DEFAULT_FROM=no-reply@example.com
      - PENPOT_SMTP_DEFAULT_REPLY_TO=no-reply@example.com
      - PENPOT_SMTP_HOST=penpot-mailcatch
      - PENPOT_SMTP_PORT=1025
      - PENPOT_SMTP_USERNAME=
      - PENPOT_SMTP_PASSWORD=
      - PENPOT_SMTP_TLS=false
      - PENPOT_SMTP_SSL=false

  penpot-exporter:
    image: "penpotapp/exporter:latest"
    restart: always
    networks:
      - penpot

    environment:
      # Don't touch it; this uses an internal docker network to
      # communicate with the frontend.
      - PENPOT_PUBLIC_URI=http://penpot-frontend

      ## Redis is used for the websockets notifications.
      - PENPOT_REDIS_URI=redis://penpot-redis/0

  penpot-postgres:
    image: "postgres:15"
    restart: always
    stop_signal: SIGINT

    volumes:
      - penpot_postgres_v15:/var/lib/postgresql/data

    networks:
      - penpot

    environment:
      - POSTGRES_INITDB_ARGS=--data-checksums
      - POSTGRES_DB=penpot
      - POSTGRES_USER=penpot
      - POSTGRES_PASSWORD=penpot

  penpot-redis:
    image: redis:7
    restart: always
    networks:
      - penpot

  ## A mailcatch service, used as temporal SMTP server. You can access via HTTP to the
  ## port 1080 for read all emails the penpot platform has sent. Should be only used as a
  ## temporal solution while no real SMTP provider is configured.

  penpot-mailcatch:
    image: sj26/mailcatcher:latest
    restart: always
    expose:
      - "1025"
    ports:
      - "1080:1080"
    networks:
      - penpot

  ## Example configuration of MiniIO (S3 compatible object storage service); If you don't
  ## have preference, then just use filesystem, this is here just for the completeness.

  # minio:
  #   image: "minio/minio:latest"
  #   command: minio server /mnt/data --console-address ":9001"
  #   restart: always
  #
  #   volumes:
  #     - "penpot_minio:/mnt/data"
  #
  #   environment:
  #     - MINIO_ROOT_USER=minioadmin
  #     - MINIO_ROOT_PASSWORD=minioadmin
  #
  #   ports:
  #     - 9000:9000
  #     - 9001:9001
里面存在几个服务:
| 服务名 | 作用 |
| traefik | 一个轻量级应用反向代理和负载均衡, penpot 2.0 后使用其为外部暴露服务 |
| penpot-frontend | 沟通 traefik 与 penpot-backend 的服务, 本质是一个 nginx |
| penpot-backend | penpot 主要服务 |
| penpot-exporter | penpot 项目导出服务 |
| penpot-postgres | penpot 后端数据库 |
| penpot-mailcatch | (可选) 一个临时邮件服务 |
| minio | (可选) s3 服务 |
对外服务修改
启用 traefik
如果需要对外提供服务, traefik 是必须的, 将对应部分取消注释:
volumes:
  penpot_traefik:

traefik:
  image: traefik:v2.9
  networks:
    - penpot
  command:
    - "--api.insecure=true"
    # - "--entryPoints.web.address=:80"
    - "--providers.docker=true"
    - "--providers.docker.exposedbydefault=false"
    # - "--entryPoints.websecure.address=:443"
    # - "--certificatesresolvers.letsencrypt.acme.tlschallenge=true"
    # - "--certificatesresolvers.letsencrypt.acme.email=<EMAIL_ADDRESS>"
    # - "--certificatesresolvers.letsencrypt.acme.storage=/traefik/acme.json"
  volumes:
    - "penpot_traefik:/traefik"
    - "/var/run/docker.sock:/var/run/docker.sock"
  ports:
    # - "80:80"
    # - "443:443"
使用 HTTP (不推荐)
如果只需要使用 http (比如只在内网使用), 则可以只启用 http 相关协议.
具体的一些配置细节在下面配置的 yaml 片段中注释.
如果使用互联网服务, 强烈建议启用
https.
# 隐去了大部分不需要修改的字段
services:
  traefik:
    image: traefik:v2.9
    command:
      - "--api.insecure=true"
      # 启动 web 接入点, 80 对应的是 Docker 内部的端口, 不需要修改
      - "--entryPoints.web.address=:80"
      - "--providers.docker=true"
      - "--providers.docker.exposedbydefault=false"
    ports:
      # 最终对外暴露的接口, 这是访问站点的唯一途径
      - "80:80"

  penpot-frontend:
    image: "penpotapp/frontend:latest"
    restart: always
    # 由于使用 traefik 对外提供服务, 这里就不需要暴露了
    # ports:
    #   - 9001:80
    labels:
      - "traefik.enable=true"
      # 设置如下三条配置:
      # entrypoints=web 表示使用 traefik 的 web 接入点, 就是上面配置的:
      #   --entryPoints.web.address=:80
      - "traefik.http.routers.penpot-http.entrypoints=web"
      # 怎么写规则? 参看: https://doc.traefik.io/traefik/routing/routers/#rule
      # e.g. 匹配特定域名 traefik.http.routers.penpot-http.rule=Host(`example.com`, `api.example.com`)
      - "traefik.http.routers.penpot-http.rule=<RULE>"
      # 80 端口即为 penpot-frontend 监听的端口, 需要修改
      - "traefik.http.services.penpot-http.loadbalancer.server.port=80"

    environment:
      ## 如果只是自己用且在互联网上暴露服务, 强烈建议在创建号用户后使用 disable-registration 关闭注册.
      - PENPOT_FLAGS=enable-registration enable-login-with-password
至此, 便可对外提供 HTTP 服务.
使用 HTTPS
使用 HTTPS 需要多做一些工作, penpot 推荐使用 letsencrypt 作为 traefik 的 certificatesresolvers,
不过如果没有公网 IP 时, tlschallenge 可能无法正常工作.
推荐使用 certbot 配合 DNS 验证获得证书, 然后配置到 traefik 中.
怎么使用 certbot? 可以参考我写的另一个博客 “使用 Nginx 代理 Github Page 并实现 HTTPS 访问” 中申请证书部分.
下面我们假定证书都放在 /path/to/cert 中, 证书为 cert.pem 和 private.key.
# 隐去了大部分不需要修改的字段
services:
  traefik:
    image: traefik:v2.9
    command:
      - "--api.insecure=true"
      - "--providers.docker=true"
      - "--providers.docker.exposedbydefault=false"
      # 启动 web 接入点, 443 对应的是 Docker 内部的端口, 不需要修改
      - "--entryPoints.websecure.address=:443"
      # 设定一个 File Privoder 的配置目录
      - --providers.file.directory=/etc/traefik/dynamic
    volumes:
      - "penpot_traefik:/traefik"
      - "/var/run/docker.sock:/var/run/docker.sock"
      # 将配置挂载到对应目录中, yaml 配置会在后面给出
      - "/path/to/certs-traefik.yaml:/etc/traefik/dynamic/certs-traefik.yaml:ro"
      # 证书目录挂载到内部
      - "/path/to/cert:/etc/certs/:ro"
    ports:
      # 最终对外暴露的接口, 这是访问站点的唯一途径
      - "443:443"

  penpot-frontend:
    image: "penpotapp/frontend:latest"
    restart: always
    # 由于使用 traefik 对外提供服务, 这里就不需要暴露了
    # ports:
    #   - 9001:80
    labels:
      - "traefik.enable=true"

      ## 如果需要同时开启 HTTP 服务并重定向到 HTTPS, 则取消下面的注释
      # - "traefik.http.middlewares.http-redirect.redirectscheme.scheme=https"
      # - "traefik.http.middlewares.http-redirect.redirectscheme.permanent=true"
      # - "traefik.http.routers.penpot-http.entrypoints=web"
      # - "traefik.http.routers.penpot-http.rule=Host(`<DOMAIN_NAME>`)"
      # - "traefik.http.routers.penpot-http.middlewares=http-redirect"

      ## 设置如下四条配置:
      # entrypoints=websecure 表示使用 traefik 的 websecure 接入点, 就是上面配置的:
      #   --entryPoints.websecure.address=:443
      - "traefik.http.routers.penpot-https.entrypoints=websecure"
      # 怎么写规则? 参看: https://doc.traefik.io/traefik/routing/routers/#rule
      # e.g. 匹配特定域名 traefik.http.routers.penpot-http.rule=Host(`example.com`, `api.example.com`)
      - "traefik.http.routers.penpot-https.rule=<RULE>"
      # 80 端口即为 penpot-frontend 监听的端口, 需要修改
      - "traefik.http.services.penpot-https.loadbalancer.server.port=80"
      # 开启即可
      - "traefik.http.routers.penpot-https.tls=true"

    environment:
      ## 如果只是自己用且在互联网上暴露服务, 强烈建议在创建号用户后使用 disable-registration 关闭注册.
      - PENPOT_FLAGS=enable-registration enable-login-with-password
同时创建 /path/to/certs-traefik.yaml, 配置以下内容:
# 配置方法见: https://doc.traefik.io/traefik/https/tls/
tls:
  certificates:
    - certFile: /etc/certs/cert.pem
      keyFile: /etc/certs/private.key
      stores:
        - default

  # 按如下配置后可以阻止 traefik 在没有匹配到对应证书后随机生成一个证书.
  stores:
    default:
      defaultCertificate:
        certFile: /etc/certs/cert.pem
        keyFile: /etc/certs/private.key
如上配置后, 即可启动 HTTPS 服务.
后端服务配置
后端需要配置的不多, 下面给出相关配置片段:
# 隐去了大部分不需要修改的字段
services:
  penpot-backend:
    image: "penpotapp/backend:latest"
    restart: always

    environment:
      ## 如果只是自己用且在互联网上暴露服务, 强烈建议在创建号用户后使用 disable-registration 关闭注册.
      - PENPOT_FLAGS=enable-registration enable-login-with-password disable-email-verification enable-smtp enable-prepl-server

      ## 强烈建议使用 `python3 -c "import secrets; print(secrets.token_urlsafe(64))"`
      ## 生成一个 Key 并替换 <KEY>.
      - PENPOT_SECRET_KEY=<KEY>

      ## 将这个地址改为对外暴露的地址,
      ## 但是要注意我们使用 traefik 对外暴露服务而不是 front 直接暴露服务, 因此端口不要填错.
      ## 客户端有时会访问这个地址, 所以填写可以正常的访问到自己站点的 domain.
      ## e.g. https://www.example.com:443
      - PENPOT_PUBLIC_URI=http://localhost:9001

      ## Database connection parameters. Don't touch them unless you are using custom
      ## postgresql connection parameters.

      ## 如果使用 s3, 请参考官方 compose 文件中的注释, 这里只考虑 Assets-fs 的情况
      - PENPOT_ASSETS_STORAGE_BACKEND=assets-fs
      ## 请注意: frontend 和 backend 的路径必须相同, 请确认配置为 /opt/data/assets.
      ##    **: 如果挂载没有使用卷挂载而是文件挂载, 这里有一些权限的坑需要处理.
      - PENPOT_STORAGE_ASSETS_FS_DIRECTORY=/opt/data/assets

      ## 注重隐私就关闭, 否则就不用动
      - PENPOT_TELEMETRY_ENABLED=true

      ## 这里强**烈建议**配置成自己的邮件服务器, iredmail 就很傻瓜.
      ## 如果自己配置了服务器, 就注释掉 penpot-mailcatch 服务.
      - PENPOT_SMTP_DEFAULT_FROM=no-reply@example.com
      - PENPOT_SMTP_DEFAULT_REPLY_TO=no-reply@example.com
      - PENPOT_SMTP_HOST=penpot-mailcatch
      - PENPOT_SMTP_PORT=1025
      - PENPOT_SMTP_USERNAME=
      - PENPOT_SMTP_PASSWORD=
      - PENPOT_SMTP_TLS=false
      - PENPOT_SMTP_SSL=false
其他配置都可以不用动, 这就完成了后端服务的配置过程.
启动服务
如果完成上述配置修改, 我们就能启动服务了.
docker compose up -d
不过启动后会有一些坑. 请参考 “坑” 部分解决问题.
完整注释的启动文件参考 “compose.yaml”.
坑
本小节将总结一些自己遇到的坑.
1. 无法上传模板, 且在读取资源时出现 403 错误
启动服务后出现如下问题中的一种或者多种:
- 无法导入模板, 也无法创建 Draft.
- 导入模板后无法显示略缩图, 查看调用显示 403 错误.
- 项目中可以上传图片, 但是不会显示, 查看调用一盎司 403 错误.
可以在互联网上查询到相关问题:
- bug: Thumbnails not loading
- can’t see uploaded images inside of penpot
- Failed to load thumbnails of projects and drafts.bug
- bug: *32 open() “/opt/data/…” failed (13: Permission denied)
主要原因是 /opt/data/assets 的权限问题. 对于 “无法导入模板, 也无法创建 Draft” 的问题,
其实是因为在 “文件挂载” 时, 默认创建的目录权限为 root:root, 这也导致后端无法写入.
可以使用以下命令进行修复:
docker exec penpot-penpot-backend-1 chown -R penpot:penpot /opt/data/
修复后可能还有问题, 既前面提到的后两个问题, 这其实也是权限问题. penpot 上传写入资源在 backend 中进行,
但读取资源是在 frontend 中 (Nginx 直接返回), 这也是为什么前后端的 Assets 目录要配置为同一个.
问题在 frontend 中的 Nginx 为 www-data (33) 启动, 而 assets 目录的 ACL 配置对 other 是 ---,
这导致 frontend 实际并没有权限读取 assets 目录.
$ docker top penpot-penpot-backend-1
UID                 PID                 PPID                C                   STIME               TTY                 TIME                CMD
penpot              3896583             3896564             0                   16:36               ?                   00:01:24            /opt/jdk/bin/java -Djava.util.logging.manager=org.apache.logging.log4j.jul.LogManager -Dlog4j2.configurationFile=log4j2.xml -XX:-OmitStackTraceInFastThrow -Dpolyglot.engine.WarnInterpreterOnly=false --enable-preview -jar penpot.jar -m app.main

$ docker top penpot-penpot-frontend-1
UID                 PID                 PPID                C                   STIME               TTY                 TIME                CMD
root                3896681             3896655             0                   16:36               ?                   00:00:00            nginx: master process nginx -g daemon off;
www-data            3896721             3896681             0                   16:36               ?                   00:00:00            nginx: worker process
# ...

$ docker exec aio-penpot-penpot-frontend-1 id www-data
uid=33(www-data) gid=33(www-data) groups=33(www-data)

$ getfacl assets/fe
# file: fe
# owner: penpot
# group: penpot
user::rwx
group::rwx                      #effective:r-x
group:penpot:r-x
mask::r-x
other::---
default:user::rwx
default:group::rwx
default:group:penpot:r-x
default:mask::rwx
default:other::---
知道问题在哪儿, 解决的方法也很简单, 就是 ACL 为 id=33 加入对应权限.
由于 frontend 内没有 acl 工具, 需要在宿主机中进行处理. 下面给出完整的命令:
docker exec penpot-penpot-backend-1 chown -R penpot:penpot /opt/data/

# www-data id=33
# setfacl -R -d -m g:www-data:r-x /path/where/your/assets/mounted
# setfacl -R -m g:www-data:r-x  /path/where/your/assets/mounted
setfacl -R -d -m g:33:r-x /path/where/your/assets/mounted
setfacl -R -m g:33:r-x  /path/where/your/assets/mounted
修复后的路径权限应该如下:
$ getfacl /path/where/your/assets/mounted
# file: fe
# owner: penpot
# group: penpot
user::rwx
group::rwx                      #effective:r-x
group:www-data:r-x
group:penpot:r-x
mask::r-x
other::---
default:user::rwx
default:group::rwx
default:group:www-data:r-x
default:group:penpot:r-x
default:mask::rwx
default:other::---
至此, 应该已经可以正确刷出对应资源.
2. 服务由于各种端口配置错误导致无法访问
必须要强调一点的是, compose 文件中的各种端口配置除了 Exposed 的外, 都是内部的端口.
这也是为什么我们将所有服务都放在 networks.penpot 中.
因此配置端口时请配置容器内部网络使用的端口, 比如:
# 隐去了大部分不需要修改的字段
traefik:
  image: traefik:v2.9
  networks:
    - penpot
  command:
    - --entryPoints.web.address=:80
    - --entryPoints.websecure.address=:443
  penpot-frontend:
    image: "penpotapp/frontend:latest"
    networks:
      - penpot
    labels:
      - traefik.http.services.penpot-https.loadbalancer.server.port=80
如果访问不通请检查配置, 可通过 Panel 查看.
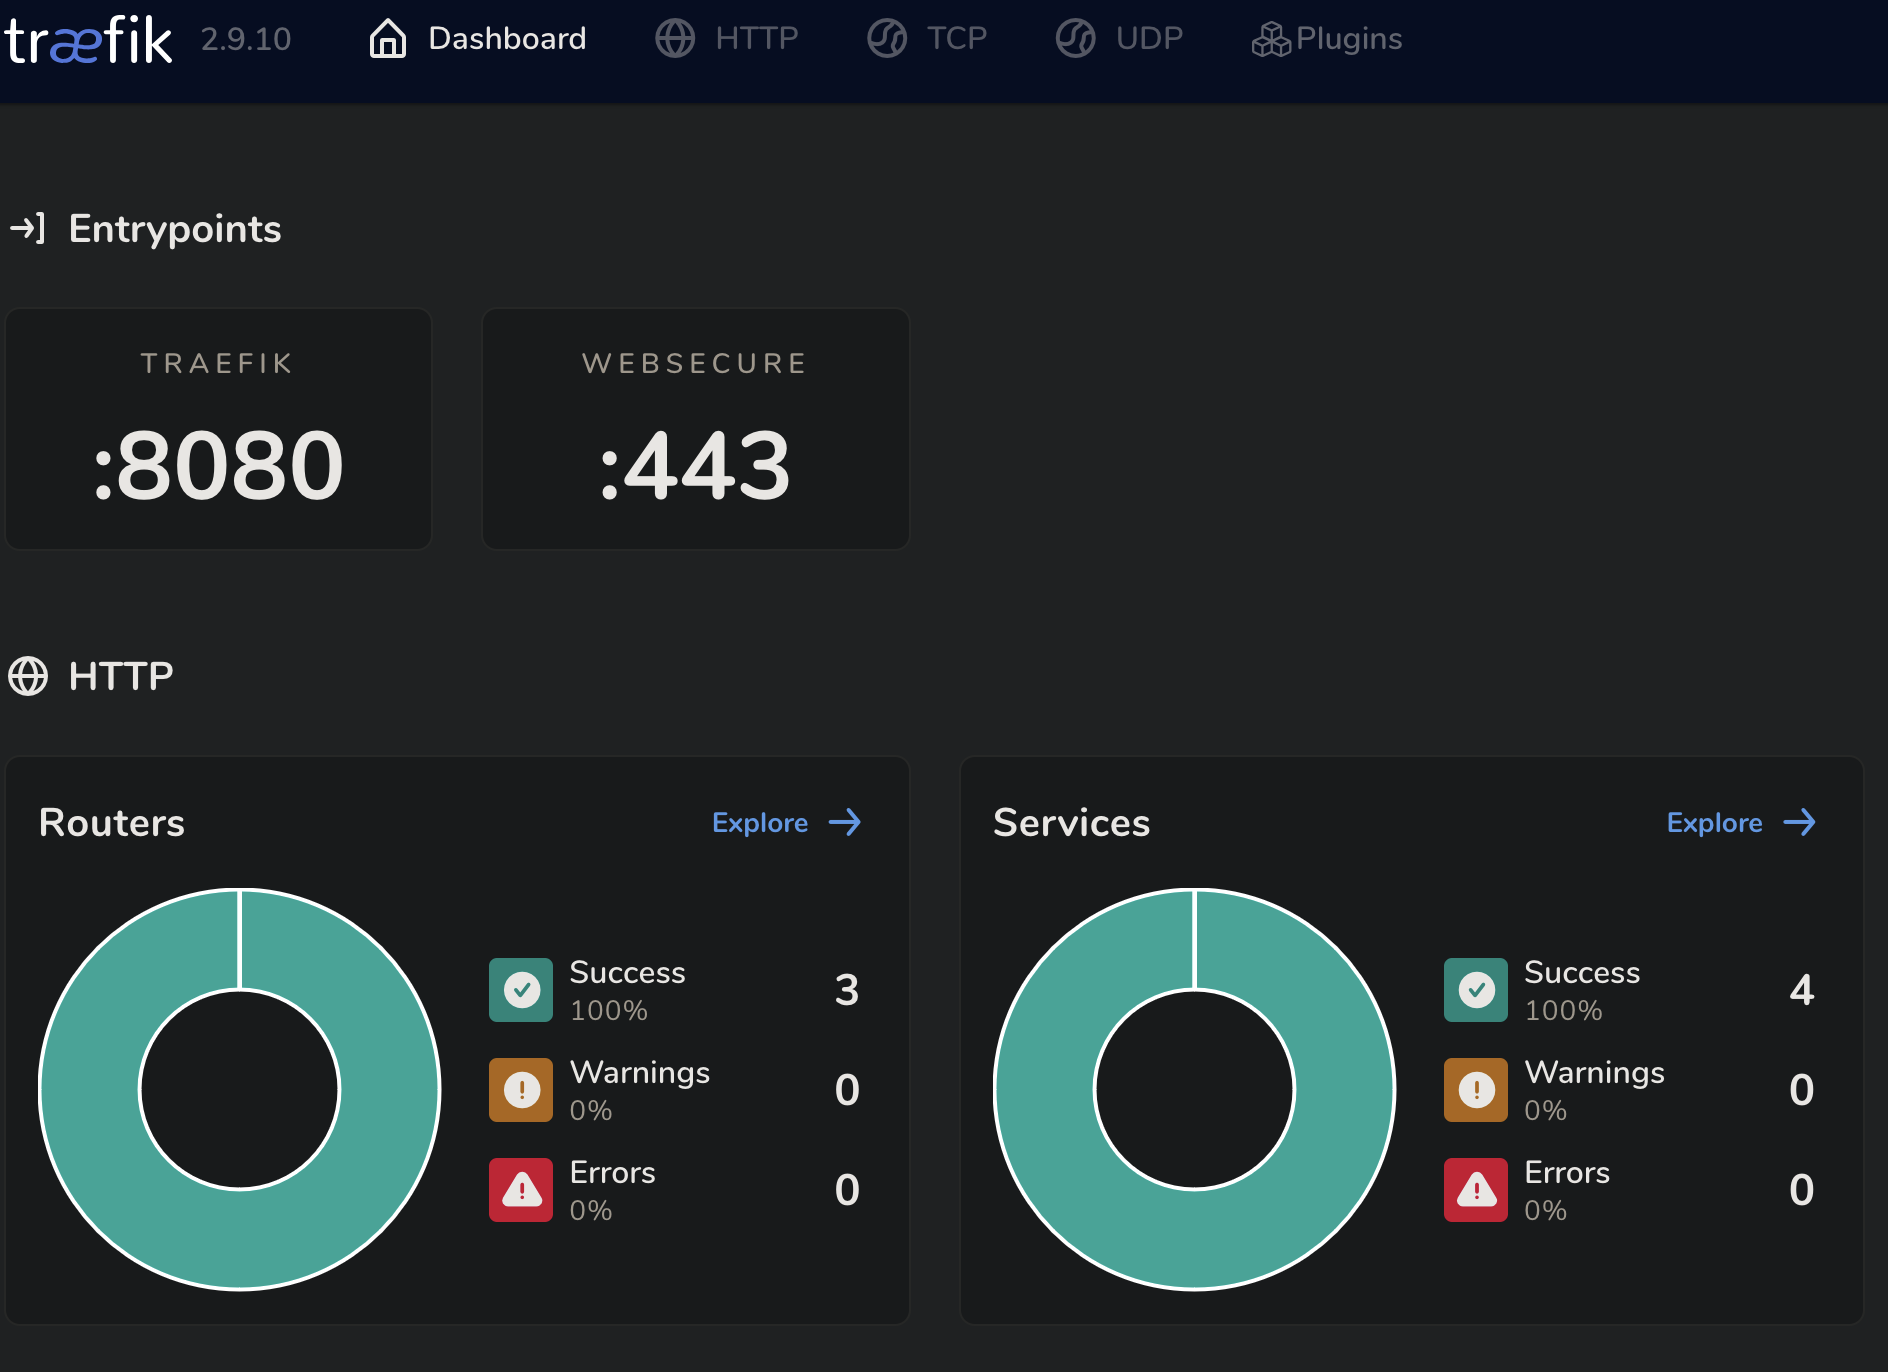
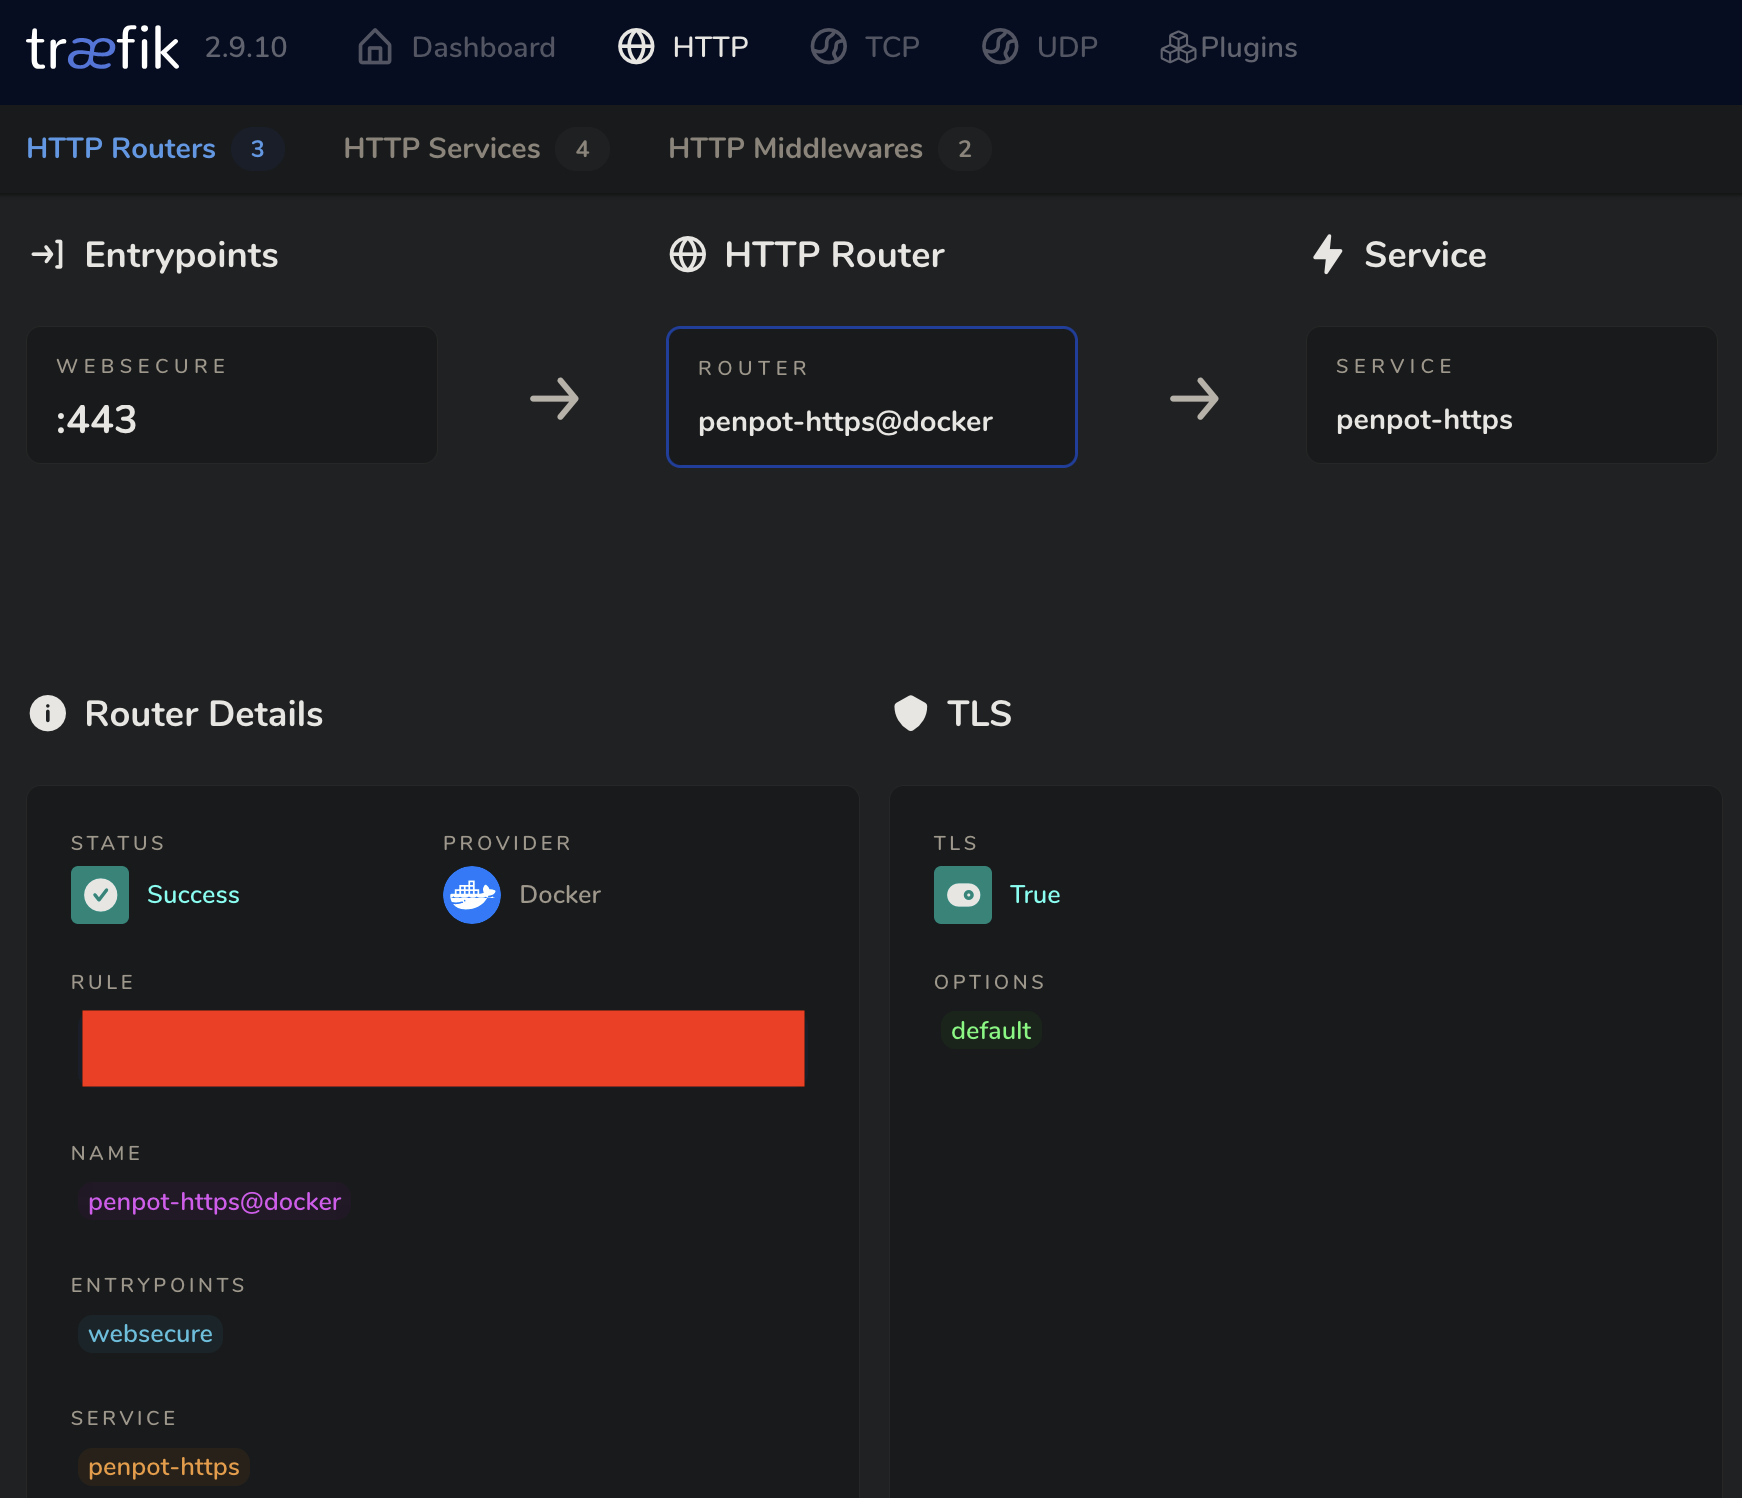
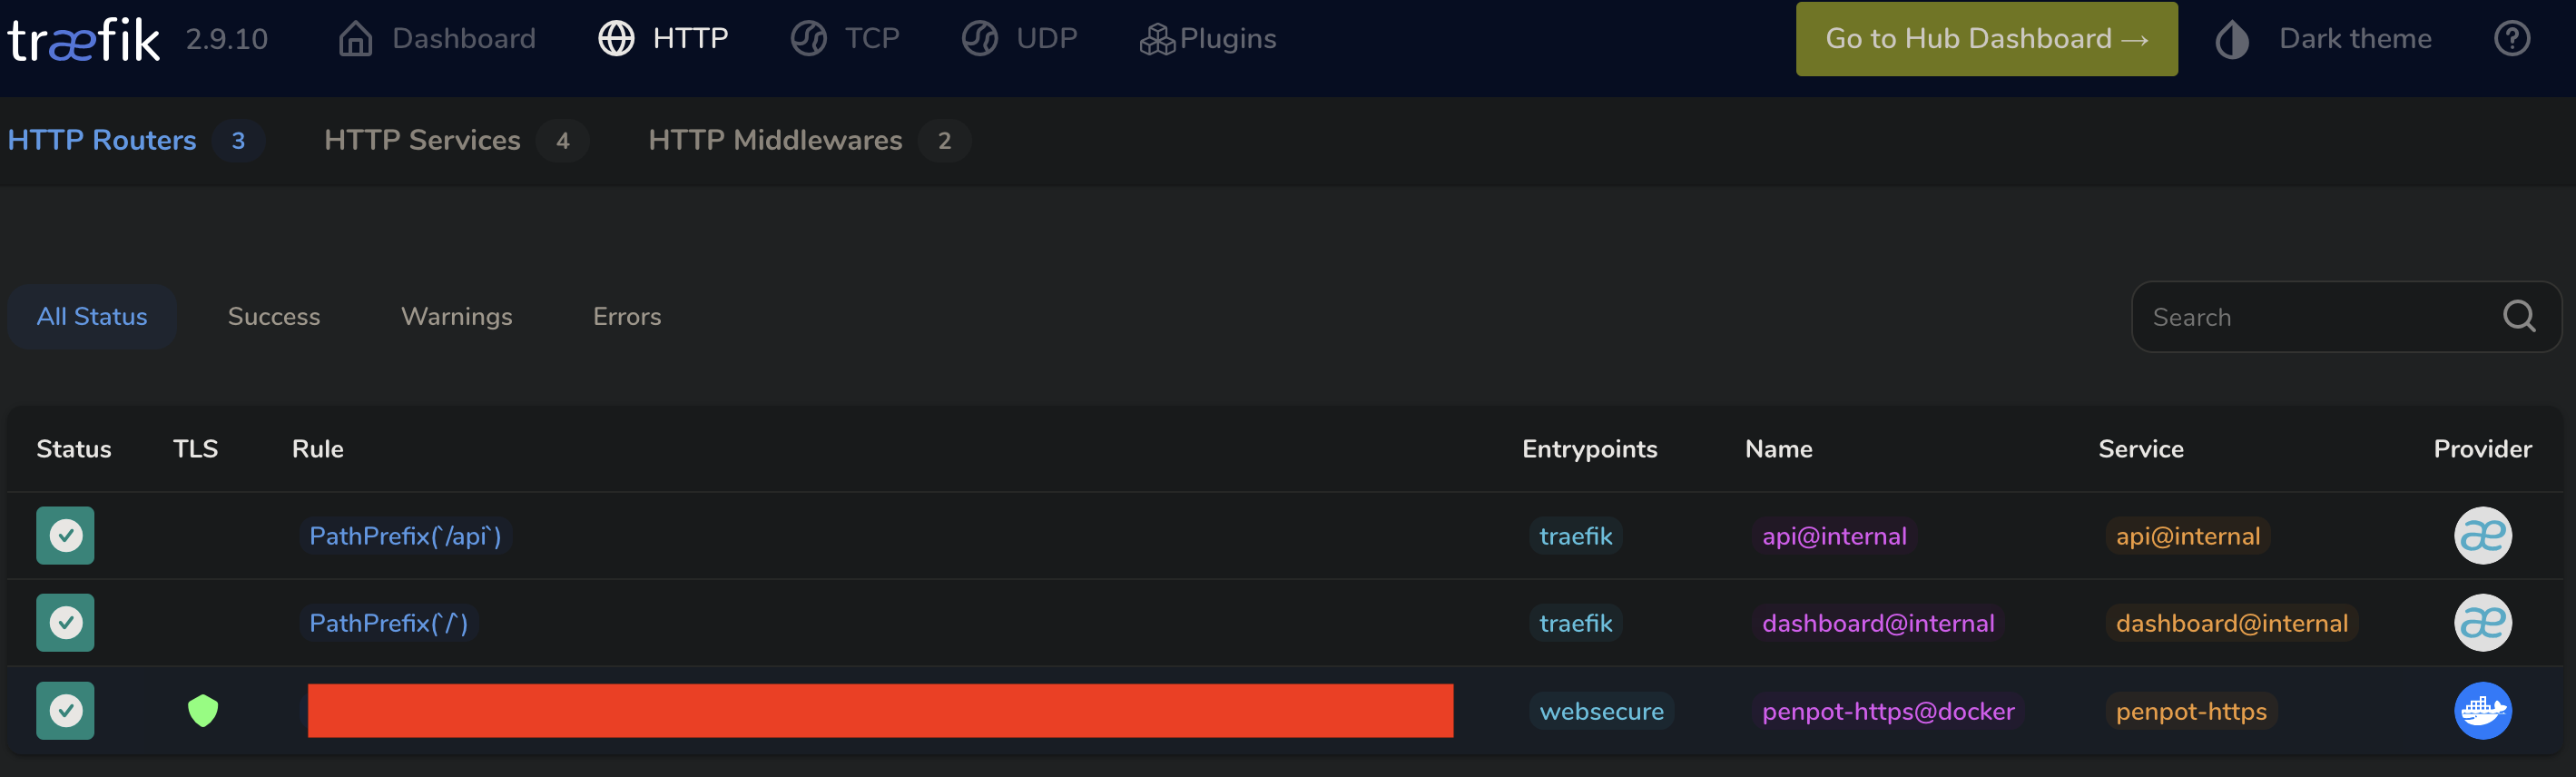
3. 使用 Traefik 管理面板
暴露端口 8080 即可.
services:
  traefik:
    image: traefik:v2.9
    networks:
      - penpot
    ports:
      - 8080:8080
界面如下:
修改后的 Compose 文件
这里提供一个修改后完整的 Compose 文件. 文件删除了官方注释, 并提供了一些中文注释, 供大家参考:
networks:
  penpot:
    driver: bridge

services:
  traefik:
    image: traefik:v2.9

    networks:
      - penpot

    command:
      # 更多配置请看: https://doc.traefik.io/traefik/operations/api/
      # 将层级结构改为 '.' 式结构配置即可.
      - --api.insecure=true
      - --providers.docker=true
      - --providers.docker.exposedbydefault=false
      - --entryPoints.web.address=:80
      - --entryPoints.websecure.address=:443
      - --providers.file.directory=/etc/traefik/dynamic

    volumes:
      - /var/run/docker.sock:/var/run/docker.sock
      # 请修改为需要挂载的源地址, 或者按照官方 Compose 文件中一样使用卷挂载.
      - ./traefik:/traefik
      - ./certs-traefik.yaml:/etc/traefik/dynamic/certs-traefik.yaml:ro
      - ./certs:/etc/certs/:ro
      - /etc/localtime:/etc/localtime:ro

    ports:
      - 80:80
      - 443:443
      - 8080:8080

  penpot-frontend:
    image: "penpotapp/frontend:latest"
    restart: always

    volumes:
      # 请修改为需要挂载的源地址, 或者按照官方 Compose 文件中一样使用卷挂载.
      # 注意需要和 penpot-backend 使用统同一目录.
      - ./assets:/opt/data/assets

    depends_on:
      - penpot-backend
      - penpot-exporter

    networks:
      - penpot

    labels:
      - traefik.enable=true

      ## 将 http 请求转到 https
      - traefik.http.middlewares.http-redirect.redirectscheme.scheme=https
      - traefik.http.middlewares.http-redirect.redirectscheme.permanent=true
      ## 注意: 这里的端口需要配置为暴露的接口, 因为重定向是发生在客户端的.
      - traefik.http.middlewares.http-redirect.redirectscheme.port=443
      - traefik.http.routers.penpot-http.entrypoints=web
      ## 替换为允许访问的 Domain, 也可以自定义 (不一定要使用 Host())
      ## 怎么写规则? 参看: https://doc.traefik.io/traefik/routing/routers/#rule
      ## e.g. 匹配特定域名 traefik.http.routers.penpot-http.rule=Host(`example.com`, `api.example.com`)
      - traefik.http.routers.penpot-http.rule=Host(`example.com`)
      - traefik.http.routers.penpot-http.middlewares=http-redirect

      - traefik.http.routers.penpot-https.entrypoints=websecure
      ## 替换为允许访问的 Domain, 也可以自定义 (不一定要使用 Host())
      ## 怎么写规则? 参看: https://doc.traefik.io/traefik/routing/routers/#rule
      ## e.g. 匹配特定域名 traefik.http.routers.penpot-http.rule=Host(`example.com`, `api.example.com`)
      - traefik.http.routers.penpot-https.rule=Host(`example.com`)
      - traefik.http.routers.penpot-https.tls=true
      - traefik.http.services.penpot-https.loadbalancer.server.port=80

    environment:
      ## Relevant flags for frontend:
      ## - demo-users
      ## - login-with-github
      ## - login-with-gitlab
      ## - login-with-google
      ## - login-with-ldap
      ## - login-with-oidc
      ## - login-with-password
      ## - registration
      ## - webhooks
      ##
      ## You can read more about all available flags on:
      ## https://help.penpot.app/technical-guide/configuration/#advanced-configuration

      ## 上述功能按需开启, 如果对不希望别人使用你的服务, 请在暴露到互联网前使用 enable-registration
      ## 开启注册功能并进行注册, 完成后使用 disable-registration 关闭注册.
      - PENPOT_FLAGS=disable-registration enable-login-with-password

  penpot-backend:
    image: "penpotapp/backend:latest"
    restart: always

    volumes:
      # 请修改为需要挂载的源地址, 或者按照官方 Compose 文件中一样使用卷挂载.
      # 注意需要和 penpot-frontend 使用同一目录.
      - ./assets:/opt/data/assets

    depends_on:
      - penpot-postgres
      - penpot-redis

    networks:
      - penpot

    environment:
      ## Relevant flags for backend:
      ## - demo-users
      ## - email-verification
      ## - log-emails
      ## - log-invitation-tokens
      ## - login-with-github
      ## - login-with-gitlab
      ## - login-with-google
      ## - login-with-ldap
      ## - login-with-oidc
      ## - login-with-password
      ## - registration
      ## - secure-session-cookies
      ## - smtp
      ## - smtp-debug
      ## - telemetry
      ## - webhooks
      ## - prepl-server
      ##
      ## You can read more about all available flags and other
      ## environment variables for the backend here:
      ## https://help.penpot.app/technical-guide/configuration/#advanced-configuration

      ## 上述功能按需开启, 如果对不希望别人使用你的服务, 请在暴露到互联网前使用 enable-registration
      ## 开启注册功能并进行注册, 完成后使用 disable-registration 关闭注册.
      - PENPOT_FLAGS=disable-registration enable-login-with-password disable-email-verification enable-smtp enable-prepl-server

      ## 强烈建议使用 `python3 -c "import secrets; print(secrets.token_urlsafe(64))"`
      ## 生成一个 Key 并进行替换.
      - PENPOT_SECRET_KEY=FmsqF9GFjDfssG_dGEht7QW--ynBEiXV44243t29SMWbbZd_RwMn91V0ri46nrCSkrt50oHo4Wxj0DXfwkk3xw

      ## 将这个地址改为对外暴露的地址,
      ## 但是要注意我们使用 traefik 对外暴露服务而不是 front 直接暴露服务, 因此端口不要填错.
      ## 客户端有时会访问这个地址, 所以填写可以正常的访问到自己站点的 domain.
      ## e.g. https://www.example.com:443
      - PENPOT_PUBLIC_URI=http://localhost:9001

      ## Database connection parameters. Don't touch them unless you are using custom
      ## postgresql connection parameters.

      - PENPOT_DATABASE_URI=postgresql://penpot-postgres/penpot
      - PENPOT_DATABASE_USERNAME=penpot
      - PENPOT_DATABASE_PASSWORD=penpot

      ## Redis is used for the websockets notifications. Don't touch unless the redis
      ## container has different parameters or different name.

      - PENPOT_REDIS_URI=redis://penpot-redis/0

      ## Default configuration for assets storage: using filesystem based with all files
      ## stored in a docker volume.

      ## 如果要使用 s3 就修改这里, 并启动 minio 服务.
      - PENPOT_ASSETS_STORAGE_BACKEND=assets-fs
      ## 保证和挂载在容器内的的目录相同即可.
      - PENPOT_STORAGE_ASSETS_FS_DIRECTORY=/opt/data/assets

      ## Telemetry. When enabled, a periodical process will send anonymous data about this
      ## instance. Telemetry data will enable us to learn how the application is used,
      ## based on real scenarios. If you want to help us, please leave it enabled. You can
      ## audit what data we send with the code available on github.

      - PENPOT_TELEMETRY_ENABLED=false

      ## 这里强**烈建议**配置成自己的邮件服务器, iredmail 就很傻瓜.
      ## 如果自己配置了服务器, 就注释掉 penpot-mailcatch 服务.
      ## **隐私问题**: 这里隐去了自己邮箱服务器的配置
      - PENPOT_SMTP_DEFAULT_FROM=no-reply@example.com
      - PENPOT_SMTP_DEFAULT_REPLY_TO=no-reply@example.com
      - PENPOT_SMTP_HOST=mail.example.com
      - PENPOT_SMTP_PORT=1025
      - PENPOT_SMTP_USERNAME=admin
      - PENPOT_SMTP_PASSWORD=123456
      - PENPOT_SMTP_TLS=true
      - PENPOT_SMTP_SSL=false

  penpot-exporter:
    image: "penpotapp/exporter:latest"
    restart: always
    networks:
      - penpot

    environment:
      # Don't touch it; this uses an internal docker network to
      # communicate with the frontend.
      - PENPOT_PUBLIC_URI=http://penpot-frontend

      ## Redis is used for the websockets notifications.
      - PENPOT_REDIS_URI=redis://penpot-redis/0

  penpot-postgres:
    image: "postgres:15"
    restart: always
    stop_signal: SIGINT

    volumes:
      - CHANGE_TO_COMPOSE_DATA_PATH/${VL_PENPOT_DB_PATH}:/var/lib/postgresql/data

    networks:
      - penpot

    environment:
      - POSTGRES_INITDB_ARGS=--data-checksums
      - POSTGRES_DB=penpot
      - POSTGRES_USER=penpot
      - POSTGRES_PASSWORD=penpot

  penpot-redis:
    image: redis:7
    restart: always
    networks:
      - penpot

  ## A mailcatch service, used as temporal SMTP server. You can access via HTTP to the
  ## port 1080 for read all emails the penpot platform has sent. Should be only used as a
  ## temporal solution while no real SMTP provider is configured.

  # penpot-mailcatch:
  #   image: sj26/mailcatcher:latest
  #   restart: always
  #   expose:
  #     - '1025'
  #   ports:
  #     - "1080:1080"
  #   networks:
  #     - penpot

  ## Example configuration of MiniIO (S3 compatible object storage service); If you don't
  ## have preference, then just use filesystem, this is here just for the completeness.

  # minio:
  #   image: "minio/minio:latest"
  #   command: minio server /mnt/data --console-address ":9001"
  #   restart: always
  #
  #   volumes:
  #     - "penpot_minio:/mnt/data"
  #
  #   environment:
  #     - MINIO_ROOT_USER=minioadmin
  #     - MINIO_ROOT_PASSWORD=minioadmin
  #
  #   ports:
  #     - 9000:9000
  #     - 9001:9001
最后 && 参考资料
Enjoy!